Don’t get phished – take a test

How many times will you be fooled? Take the test and learn not to be.

Phishing is very common. I’ve written a number of posts cautioning readers and providing examples.

Today I came across something even better! An online phishing test hosted by Google. It presents you with messages and asks whether they are “real” or phishing.

It’s a test… so no messages are really real. But the messages do give you the opportunity to learn if you’d fall victim to phishing. And to learn how to avoid being a victim. Whether the message is phishing or not is explained and illustrated after you judge the message’s authenticity.

Fun. Try it.

Jigsaw | Phishing Quiz

Phishing, don’t get hooked!

Give yourself a Merry Christmas, don’t get phished.

I have posted about phishing before. Hopefully some of what I’ve posted or others have posted has been useful to you. I’m posting again because I got another phishing email just recently that, when I saw it in my Inbox, made me worry for a few moments. That’s because my Inbox shows the subject and the first words of the body of the email. So, what I saw in my Inbox was, “Update on Your Yahoo Account the password for your Yahoo account was recently changed”!

Immediate concern. I did not recently change my Yahoo password. And the sender column of my Inbox does not show the email address. It shows the sender name, in this case “Yahoo”. Have I been hacked? Fortunately, no. If I was in a rush and not paying attention though I might have given up my Yahoo credentials out of panic. So I’m posting again to remind myself, and anyone reading this, DON’T rush when you get an email about your accounts. Take the time to look them over and be certain of what you’ve gotten.

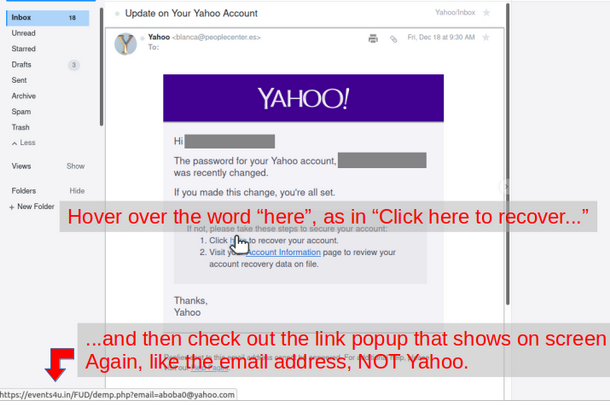
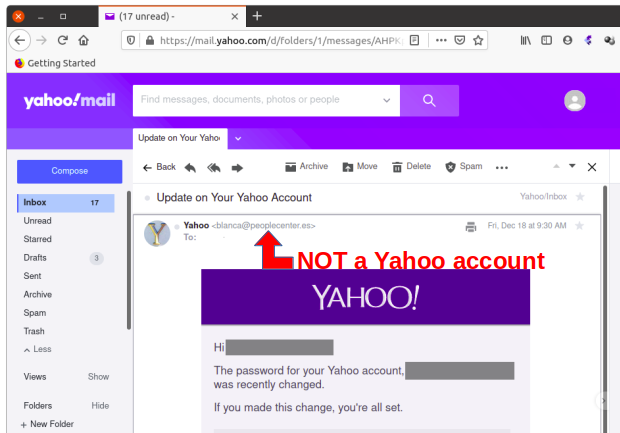
In this case the Inbox view said the email was from Yahoo. As soon as I opened the message it was clearly NOT from Yahoo.

From there, it’s all the usual stuff to know it’s fake. Hover over the link to go fix the “problem” and see the link doesn’t go to a Yahoo.com website.

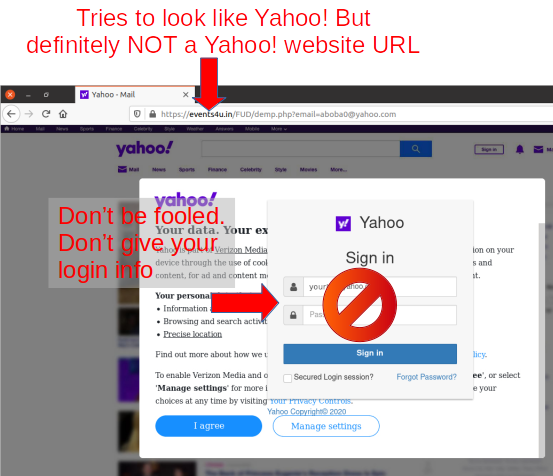
Then last, I clicked on the link so you could see the webpage it goes to. And you see even though it tries to look like a Yahoo page it clearly is not a Yahoo site.

Please, don’t get hooked. There’s not enough info in the Inbox view to know whether this is something to worry about or not. Once the email is opened there’s two different opportunities to see it isn’t a Yahoo! message.

  • The “From:” is not a Yahoo! account.
  • Hover over the link and it clearly is not a Yahoo! URL.
  • And finally, if the link is clicked… the URL for the webpage definitely is not a Yahoo! URL.

Stay web safe and have a Merry Christmas.

Got vsftpd?

The path from “need a few files” to providing any time you like self service.

I tend to have computer components and a few spare computers hanging around. Both because I haven’t got hit with Marie Kondo fever (I’m not really bad) and because I help my kids with equipment selection, sometimes purchase, and benefit from getting their leave behinds to experiment with.

In this case one son had upgraded so I got the old laptop. It needed some work to be useful, badly damaged digitizer. He also wanted files from the hard drive but didn’t have opportunity to get them before leaving me the pc.

I replaced the digitizer and swapped out the hard drive with a loose one I had around so I could use the pc. Put the original drive in an external USB3 enclosure I had, labeled it not to erase, and set it aside.

Then said son asked for four files from the old drive. No problem I thought. Plug the drive into the USB port of my laptop, read them off the drive and send. Nope.

This son is one I’ve gotten to use Linux on several systems. I’d set up Linux for him on this system and used the default partition method at the time, LVM. Couldn’t read the drive. My system, using the current default, ZFS, didn’t have the ability to mount the drive.

Here’s one of the reasons I find Linux to be easy to use, all I needed to do was install LVM on my system and reboot. Presto I could read the external drive. It now automatically mounts when plugged in to USB. And the ZFS install of my system wasn’t affected at all.

Now try to read his files for him. Nope. He had been traveling internationally so I’d set up an encrypted home directory for him. Fortunately I’d kept the encryption passphrase in my password safe and was able to mount the encrypted home directory. I still wasn’t getting files in the clear though. It seemed related to the fact the drive was no longer the boot drive. Went down that rabbit hole for a bit and seemed to be making progress. Finally though, to get him the files, I just asked him if he recalled his login password. He did.

Booted the old pc and selected the external HD to boot from, it went right to login screen, enter password, and I’m logged in to the old system. Another Linux advantage, take an original host drive, plug it into USB on another pc, select that drive as boot source, and Linux boots without complaint.

I sent him the files he wanted. Then I thought to send him a list of all files in his home directory. After all he might want others and just not recall their names. Sure enough, he wanted a few more after getting the list.

Now I’m thinking, if he wants more files, then more work for me. What if, instead, he can get the files on his own any time he likes? Could I set up an ftp site he could connect to and get files whenever he wished?

This is where vsftpd finally enters the picture. My plan was boot from the old hard drive using a spare pc, make an ftp site that used an encrypted connection so not even username/password are sent in the clear and provide him the connection information.

vsftpd is an easy set up. Run the installation and it accepts anonymous connections by default. Didn’t want anonymous though and wanted connection to go to his home directory. Read the man, linux.die.net is my favorite man source, search for others’ descriptions of how to set up a credentialed, encrypted connection, and keep hacking at it until it worked.

The thing that really stymied me was the obscure failure message when vsftpd was failing to start after some of the config changes I made. I couldn’t find a parameter to boost the detail of the logging and was left with only “status=2/INVALIDARGUMENT” to try and figure out what parameter was the problem. Fortunately I came across Why my vsftp service can’t start?. It offered the tip to run /usr/sbin/vsftpd manually from the command prompt and the specific issue might be revealed. I tried, the problematic option was revealed, changed the option and presto, working vsftpd using TLSV1 for connections!

For your interest, here’s my working vsftpd.conf

anonymous_enable=NO
local_enable=YES
chroot_local_user=YES
allow_writeable_chroot=YES
listen=NO
listen_ipv6=YES
dirmessage_enable=YES
use_localtime=YES
xferlog_enable=YES
user_sub_token=$USER
local_root=/home/$USER
rsa_cert_file=/etc/letsencrypt/live/fullchain16.pem
rsa_private_key_file=/etc/letsencrypt/live/privkey16.pem
ssl_enable=YES
allow_anon_ssl=NO
force_local_data_ssl=YES
force_local_logins_ssl=YES
ssl_tlsv1=YES
ssl_sslv2=NO
ssl_sslv3=NO
require_ssl_reuse=YES
ssl_ciphers=HIGH
pasv_min_port=xxxxx
pasv_max_port=yyyyy
pam_service_name=vsftpd
implicit_ssl=NO

A little bit Docker

Platform virtualization, a more granular way to virtualize.

Virtualization is something that’s been mainstream for years. I’ve used it for production environments to increase hardware utilization and improve failure tolerance. And it is also great for quickly setting up and using test environments whether to test before production deployment or to evaluate a technology without intermixing with your production environment.

Docker, platform as a service virtualization, has been around for a few years now, since 2013 actually. And I’d never used it. I decided it was time to change that.

So… what to do? Well I’ve been suspicious that my Internet Service Provider, ISP, isn’t actually providing the promised speeds. Whenever I’d check the speeds at a speed test website it would be slower than the service promise. Of course that’s very intermittent testing and I couldn’t really maintain a regular schedule, note the results, and have a documented history to complain to my ISP about.

In the past I’ve used a program called Nagios to monitor network services and computers on a network. A little searching and I found that Nagios has a feature, a plug-in it’s called, that can be used to monitor Internet upload and download speed on a schedule.

With this information in hand I decided to try using Docker to run a Nagios container with the speedtest plug-in. Quite a bit for me to get my head around. This particular plug-in works differently than the ones built into Docker Core so I needed to work out how to get it working. Of course there’s documentation online but it is old and the plug-in has been updated a few times while the documentation has not.

And with Docker itself there’s quite a bit to learn. Easy enough to get a container started. However there is a lot going on behind the scenes. Docker has images and containers. Images are the templates for the containers. Start an image and a container is created. Stop the container then start the image again and a new container is created. Without a guide, which I haven’t found yet, that explains the “theory of Docker” one might keep starting the same image and by that technique keep creating containers. This leads to not finding any of the customizations made in the last container because starting the image again starts a new container.

Then of course, there’s getting to the container command line. Basically, getting inside the machine. Once there it can be difficult to accomplish anything because many of the common command line tools, like a text editor, are not in the container. That leads to needing to find how to access the files and modify them from outside the container.

There are ways to resolve all the above. More than one way for each of the issues.

My good fortune is that I’m attending the (ISC)2 2020 Security Congress this year. Virtually, of course. And there is a Docker related session I’ve signed up for. Excited to learn about this.

  • 7 Layers of Container Insecurity

Security – It needs to make sense

Don’t make things unnecessarily difficult and then say “it’s for security”.

At this point I hope most everyone knows basics about online security like don’t reuse passwords, use unique passwords at each site, use complex passwords, use multi-factor authentication when available, and use a password safe. These are all components that rely on the user (yes, in a corporate environment these things should be controlled by the IT department). The user though is only part of the security equation.

The website owner also needs to contribute to a secure online experience. And I submit that making access and credential requirements proportional to the criticality of the information available in the account is part of that responsibility. After all, if your credential isn’t easy to use or needs to be changed because of some requirement that isn’t an issue for any other website it doesn’t exactly make you want to use the website or promote it to family and friends.

This is a tale of a website which, IMHO, has account credential practices that are unnecessary and antithetical to positive user experience. Also they are not proportional to the value of what’s being protected and are uniquely cumbersome compared to any other websites I have credentials at.

I have a credit card. Surprised? It has a rewards program. The rewards program website is separate from the credit card company website. It is a third party provider of credit card reward program services, CU Rewards. And it has two “security features” that to me are absolutely abhorrent.

First is its CAPTCHA to prove I’m not a robot. I’m not against CAPTCHAs. I don’t mind them and they’re on many sites that I use. However the CU Rewards website CAPTCHA is one that regularly requires me to complete two, three, or more “click on all the …” CAPTCHA challenges to prove I’m real.

C’mon, really? Every other website I use that has CAPTCHA, it takes one challenge before it decides I’m not a robot. CU Rewards, never only one challenge. Why?

The images are lower resolution than most but certainly not the lowest. Why make access so difficult when I’ve already provided my credentials? What’s being protected? My retirement savings, no. My bank account with it’s wad of cash, no. My medical record with all that PHI (Protected Health Information), no. What’s being protected is my ability to order “free” stuff that is available on my credit card rewards program. This degree of difficulty to gain access does not make sense. It is not at all proportional to the value of what’s being protected.

The second issue with this website’s security is credential creation. I do use a password safe. I do use complex passwords. I do not reuse passwords. I have user accounts with banks, investment companies, retirement accounts, schools, job boards, etc. The list goes on and on. If my credential needs to change at any one of these websites, even those that require a user name separate from my email address, what needs to change is my password. Nothing else.

Imagine if you will a financial institution issuing you a credit card and you create a user credential to have online access to your information. Eventually they send you a new card. Maybe you lost your card, maybe you suspect some fraud and got it replaced, maybe it was about to expire and the replacement card was sent as a routine part of the account management process. Or how about an investment account where you’ve invested in stocks and index funds through your employer’s savings plan but have left the employer, managed the investments yourself for a while and then turned over fund management to an investment management company.

How many NEW user ids do you imagine needing to create for the above scenarios? Maybe a new one each time the credit card company issues you a new card and, for the investments, a new one when leaving the employer and then another new one on giving the investment management company the responsibility to manage the investments. Seems crazy right? You’re still you. The company you’re doing business with is still the same credit card company or same financial services company. You wouldn’t expect to need to create a new user name and password for any of these changes, would you? You’ve probably had some of these changes happen and not had to create new login credentials.

And yet CU Rewards requires a new login id be created whenever a new credit card is issued even though the card is from the same financial institution and is replacing your previous card. After being issued the new card your account information is still accessible at the financial institution using the same login credentials you’ve always used. The new card continues to accumulate points on the same CU Rewards program even automatically transferring the points balance from your old card to the new one. However CU Rewards won’t give you access to your account without creating a new user name and password?!

This, in my opinion, is absolutely TERRIBLE security design. It creates unnecessary barriers to the user and is not at all proportional to the value of what’s being protected. The requirement is 100% unique among all my other online credentials which is an indicator nobody else thinks it is a good process either. There is not a single other business be it bank, credit card company, finance company, mortgage, investment, insurance, medical records, or online retailers that requires a new login credential be created when a new credit card is issued.

CU Rewards your credential practices suck. You need to change them to stop sucking.
PayPal scam

Illustrations to help you avoid the scam.

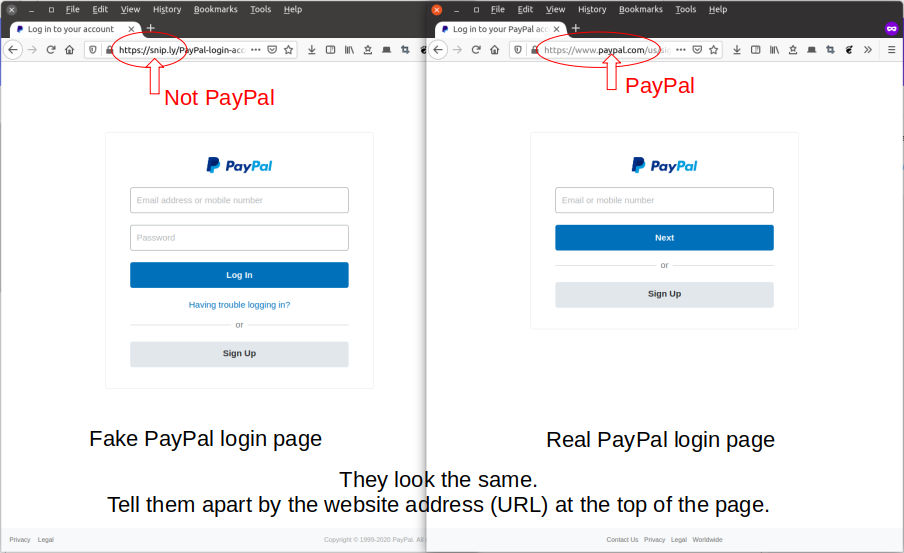
Another example of a scam email. It copies PayPal’s look to a T. The apparent email address service@intl.paypal.com is not the email address! The actual email address begins after the “<“. It is an indecipherable address and once you spot the “@” sign you see it isn’t @paypal.com. This isn’t a PayPal email.

Don’t click the button in the email that says “Log in Now”. It will go to a website that looks like PayPal but it’s not. If you enter your PayPal credentials to login then your PayPal account has just been compromised. Don’t do it.

We be scamming. Seems yes, but… maybe no?

Never seen this before.

I am unemployed due to COVID-19. Probably something that’s happened to many of you. I’ve also been searching for work continuously, continuously, since loosing my director of IT role. I have not gotten an offer on anything equivalent and have had periods of unemployment where I didn’t get responses for anything I applied to. The low point was when I was so desperate I applied for an hourly position at Dunkin Donuts and they didn’t call me back! I have gotten help desk roles and that position is what recently ended due to coronavirus.

Since I have been continuously searching for employment for years I’ve got accounts on all the major job boards, CareerBuilder, Monster, Beyond, Indeed, and many minor and regional ones too. And of course I use LinkedIn. My profile is here, Alan Boba. Message me if you need someone to manage your technology.

Recently I was very disappointed by the response I got back from an application, “Thank you but we’re not interested in you”. The position was very local to me which would have been great. And the IT Manager job description was one I would have written if asked to write one that was an exact match for my skills. I was really hopeful when I sent the application and very very disappointed when the rejection came. Not even a phone screen.

Next position I applied for on CareerBuilder I was presented with a message as soon as I completed the application, “would you like to instantly apply to these 26 matching jobs?” Typically I review job title and description, check the location and do some other review before applying for a position. This time I just hit “apply”. Right away CareerBuilder came back with a similar “instant apply” message and again I clicked “apply”. This kept happening. I kept clicking. I figured to be clicking until “matching jobs” ran out. They never did. I stopped clicking after instant applying to about 500 or so “matching jobs”.

Wouldn’t you know… next day I was getting invitations to online interviews. I was skeptical and cautious. The biggest and most immediate red flag was that all the “interviews” were with people using @aol.com and @gmail.com email addresses. No business emails. But hey, I didn’t have any real offers to reply to and who knows, maybe I’m just too suspicious and one of these was real.

One of them even said they were part of an agribusiness that was started in Australia and expanding in USA. The business is real and it even has two locations in the western US that were correctly identified in the chats.

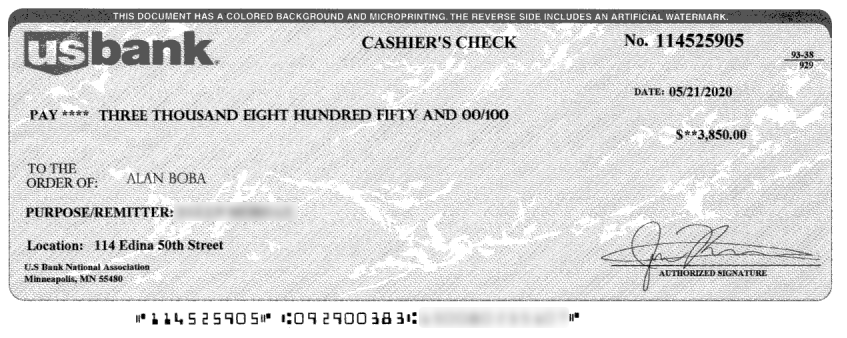
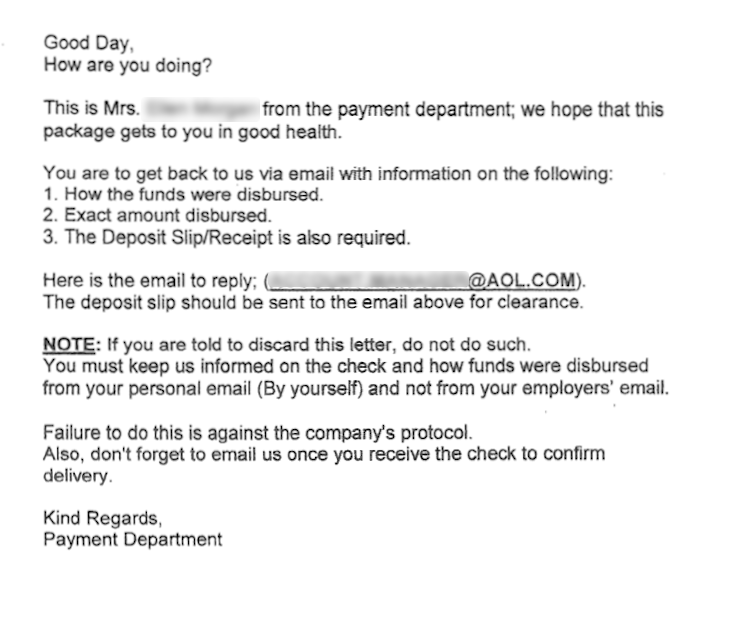
I received a check by FedEx, almost $4,000! Ostensibly to buy equipment I would need for my office. A cashiers check though, not a check drawn from a business account. The letter that came with it is on plain paper, not office stationery. It doesn’t say what I should buy and doesn’t have a business name or address. Plus I am again directed to communicate with a non-business email account, @aol.com.

I’ve tried to validate the check’s bank routing number and two of the three routing number websites I’ve found recognize the routing number. I’ve also scanned the check front and back. No watermarks show up in either scan. And the check doesn’t have a stamp on it’s face with “valid for xxx days”. A stamp I’ve seen on every cashier’s and corporate check I ever recall handling.

For now I’m still thinking this is a scam. But I’ll play along because I’ve got the time and I’m unemployed. And who knows, maybe I am just too suspicious.

In case you’re curious and want to see what I’ve received so far, take a look at the letter and check that came in the FedEx package. It does cost money to send via FedEx. So unless a business’ FedEx account has been hijacked the scammers have spent some money to send me the check.

Ubuntu server upgrade 16.04 to 18.04 (20.04 pending)

Virtualize, document, and test. The surest way to upgrade success.

For years my server has been running my personal websites and other services without a hitch. It was Ubuntu 16.04. More than four years old at this point. Only a year left on the 16.04 support schedule. Plus 20.04 is out. Time to move to the latest platform without rushing rather than make the transition with support ended or time running out.

With the above in mind I decided to upgrade my 16.04.6 server to 20.04 and get another five years of support on deck. I’m half way there, at 18.04.4, and hovering for the next little while before the bump up to 20.04. The pause is because of a behavior of do-release-upgrade that I learned about while planning and testing the upgrade.

It turns out that do-release-upgrade won’t actually run the upgrade until a version’s first point release is out. A switch, -d, must be used to override that. Right now 20.04 is just that, 20.04. Once it’s 20.04.1 the upgrade will run without the switch. Per “How to upgrade from Ubuntu 18.04 LTS to 20.04 LTS today” the switch, which is intended to enable upgrading to a development release, does the upgrade to 20.04 because it is released.

I’m interested to try out the VPN that is in 20.04, WireGuard, so may try the -d before 20.04.1 gets here. In the meantime let me tell you about the fun I had with the upgrade.

First, as you should always see in any story about upgrade, backup! I did, several different ways. Mostly as experiments to see if I want to change how I’m doing it, rsync. An optional feature of 20.04 that looks to make backup simpler and more comprehensive is ZFS. It’s newly integrated into Ubuntu and I want to try it for backups.

I got my backups then took the server offline to get a system image with Clonezilla. Then I used VBoxManage convertfromraw to turn the Clonezilla disk image into a VDI file. That gave me a clone of the server in VirtualBox to practice upgrading and work out any kinks.

The server runs several websites, a MySQL server for the websites and other things, an SSH server for remote access, NFS, phpmyadmin, DNS, and more. They are either accessed remotely or from a LAN client. Testing those functions required connecting a client to the server. VirtualBox made that a simple trick.

In the end my lab setup was two virtual machines, my cloned server and a client, on a virtual network. DHCP for the client was provided by the VirtualBox Internal Network, the server had a fixed ip on the same subnet as the VirtualBox Internal Network and the server provided DNS for the network.

I ran the 16.04 to 18.04 upgrade on the server numerous times taking snapshots to roll back as I made tweaks to the process to confirm each feature worked. Once I had a final process I did the upgrade on the virtual machine three times to see if I could find anything I might have missed or some clarification to make to the document. Success x3 with no changes to the document!

Finally I ran the upgrade on the production hardware. Went exactly as per the document which of course is a good thing. Uneventful but slower than doing it on the virtual machine, which was expected. The virtual machine host is at least five years newer than the server hardware and has an SSD too.

I’ll continue running on 18.04 for a while and monitor logs for things I might have missed. Once I’m convinced everything is good then I’ll either use -d to get to 20.04 or wait until 20.04.1 is out and do it then.

Jonas Salk Middle School Career Day

A presentation about information technology with demonstrations.

I volunteered to create a presentation for career day at school. Actually, my daughter asked me and I said “okay”. Then career day presentations were changed from in person to online because of corona virus.

It would have been so much easier for me to do in person. I’m certain the total time spent would be less than what I needed to produce the video! Everything I wanted to present could have been done live. Timing would be easier and adjustments could be made in each session depending the interest of the previous audience and questions during the presentation.

That wasn’t to be.

The good thing about the video is I was able to produce it. The bad things are obvious in review. There are several parts where the dialog is disjointed and not flowing with events on the screen. Arrangement of some screen elements blocks others in an undesirable way. And I need to think more of the audience. This is likely much better for high school seniors than eighth graders. Work more on the script and be EXPRESSIVE!

Making this video was an enjoyable and challenging experience. I had to learn things I’d never known to make the video. And watching myself and the content I can see how it could easily be improved. Information I’ll tuck away to use if and when there’s a next time.

If you’d like to check out the video, here it is.

At the end of the video is a list of the software used to produce it. That same list, with working links, is below.

Ubuntu 18.08 runs the laptop used to create this video (it’s an alternative to Windows, OS X, and Chrome OS). https://ubuntu.com/

OpenShot video editor was used to create the video. https://www.openshot.org/

vokoscreen made the screen video captures that got edited in OpenShot. https://linuxecke.volkoh.de/vokoscreen/vokoscreen.html

GIMP, GNU Image Manipulation Program, was used to create or edit some of the images in the video and to obscure and alter some portions of the video images. https://www.gimp.org/

Cheese was used to record my head shot and voice.
https://wiki.gnome.org/Apps/Cheese

Pick and OpenShot’s chroma key effect were used make the background behind my head transparent rather than appear in a box that blocked the background. https://www.kryogenix.org/code/pick/

I used LibreOffice Writer to take notes and make plans as I developed the video and for the scripts I used to guide narration. LibreOffice Calc helped calculating how to adjust length of some clips to fit the target time. https://www.libreoffice.org/

MySQL backup and restore

Dig in and do it, and repeat. Get the desired result faster by combining research and testing.

Maintenance is important. A car needs oil changes or eventually the engine will be damaged by regular operation. A server needs software updates to fix bugs and protect against threats. Even when those things are done failures can happen that create problems returning to normal operation.

For a car there needs to be a spare ready to go in case of a flat. If there’s not a spare ready for use it will take longer to get the car back in operation when a flat happens. For a computer, programs and data need to be backed up. If a disk drive crashes the information stored there may be lost or too expensive to recover, so just as good as lost.

This website has not been well protected for too long and I knew that needed to change. There’s a server operating system, a web server, WordPress software, and a MySQL database that all operate interdependently to make it work. As the amount of content slowly continues to grow my manual system to back everything up has become too cumbersome and is not done frequently enough to ensure minimal to no loss of data.

That needed to change.

Step one – automate the MySQL backups. Documentation states the “logical” backup method is slow and not recommend for large databases. The alternative “physical” backup entails stopping the database server and copying the files. The licensed MySQL Enterprise Backup performs physical backups and from what I’m able to tell runs clone databases so one can be stopped and the files backed up while the clone continues to run and is available for use.

This is a hobby operation and has limited resources so purchasing a license for Enterprise Backup is out of the question. Taking the whole thing offline to backup probably doesn’t bother anyone except me. Still, I did want to be able to continue to run the server while the databases are being backed up. Enter logical backup.

It didn’t take long to find the command, mysqldump. Confirming that it would backup everything including user names and passwords so all the accounts got restored with all the data took longer.

Despite my best search-fu I was unable to find any documentation that explicitly says “do this” to back up user accounts in addition to system databases and other databases. Let me fill that gap by saying “do this to back up user accounts, system databases, and other databases”. mysqldump -u root -p -h server.yourdomain.org --all-databases -r backup_file.sql. I did find the preceding command as the backup command. Nothing I could find said this backs up user accounts and system databases. I tested it. It does.

With the backup done, the next step is restore. And confirming the restore works as expected. Another case of things that otherwise seem obvious not being declared in the documentation.

Restore from the command line looks like this: mysql -u root -p database < backup_file.sql. But wait, I want to restore all databases. Search-fu failed again to find any explicit instruction how to restore all databases and what database to name on the command line.

Try the command without naming a database to see if all are restored. No, that fails. Then a flash of insight. Create an empty database, name that on the command line, and try the restore again. It works!

$ mysql -u root -p
> create database scratch;
> exit
$ mysql -u root -p scratch < backup_file.sql

Did this a few times and then restored the tables. As far as I’ve been able to determine the restore is an exact replica of the backed up data.

It seems odd that important use cases, complete backup of database server and complete restore of database server aren’t clearly documented. The information is there but important nuggets are left out. The only way to be sure you’ll get what you need is to experiment until you’re able to produce the results you need.

So yes, do the research but also just do the work and inspect the results. When research doesn’t clearly answer the questions backup it up with experimentation. Do both and get a result faster.