Rehoming all my Domains, Oh My !

Domains and registrars, and services, and what?

Google is selling their domain registration business to Squarespace. If your webserver is at a dynamic Internet address, the address needs to be monitored so it can be updated on the name server when it changes. Squarespace name servers won’t accept dynamic updates.

Monitoring the network to see the router’s public Internet address change and updating Google Domains‘ name server was done with Google provided DDNS instructions and settings. Squarespace, the provider they’re selling their Domain Name business to, does not support DDNS. Once Squarespace is actually managing the domain name it will keep the old information about the Internet address in its name server but doesn’t provide a way to automate updates. Once the domain name is on Squarespace and my Internet provider updates my modem’s Internet address, access to this website by name goes down unless I’ve set up another way to keep the website address updated.

Two ways I found to avoid this are move to a registrar that supports DDNS, like Namecheap, or find a DNS provider that supports DDNS and doesn’t require registering a domain with them, like FreeDNS (at afraid.org, yes, but don’t be), and use of their name servers as custom name servers with the domain registrar. That approach requires two service providers for each domain, a registrar and a DNS service.

There’s a fee with registrars for migrating a domain to them. Not much but if you can just change a setting and then there’s no need to pay to move to a different registrar then why not do that?

“THAT”, in this case means leaving the domains with Google and updating the name servers on Google’s domain registration record to the FreeDNS name servers and then keeping the Internet address updated on the FreeDNS name servers.

I’ve moved one domain to Namecheap to see how I like that, an $11 move. It will give me a hand at a third domain control panel, Google Domains, Squarespace, and Namecheap.

The others I’ve created records for them on FreeDNS, updated the name server records on Google Domains and will start using the Squarespace control panel to manage them when they transfer from Google. Squarespace doesn’t support DDNS but if custom nameservers are supported the move from Google Domains will go without a hitch.

Haven’t moved boba.org yet. Want to interact with the other sites a bit before deciding to use FreeDNS and their name servers with Squarespace domain registration or move to a registrar that supports DDNS with their name servers.

I do have to spend time out of the house to interact with the sites through the new DNS / name server setups. Sure, could do it through the phone if I turn off the WiFi but LTE isn’t very good here and I don’t like phone screen for web browsing. If LTE was good could tether the computer to the phone and browse the sites on the pc as I’d like. Kind’a lucky the weak signal, more fun to go out. Maybe find a coffee shop in a mall, buy a cup, sit in one of the seats and figure out how to choose the better option, then compare the details and make the choice.

Goodbye Google Domains!! ?? !!

…hello Namecheap ddns or, hmm, domain hosting too?

This domain, boba.org, is on a server I control, behind a dynamic IP address. Google Domains provides the domain hosting and supports DDNS which made it easy to have Google nameservers be authoritative, keep the A record updated, and manage the physical server.

Now Google’s giving up the domain name business, along with all the convenient features they bundle like DDNS, redirects, privacy, etc.

It’s being transferred to Squarespace. And Squarespace doesn’t include DDNS or offer it as a bundle.

Still need a way to update domain record with new address when it changes BUT can’t do that with Squarespace nameservers.

Checking if domain record can have nameserver but no A record with IP. IF SO, domain record points to nameserver that can be updated, e.g. Namecheap free DNS, and domain continues to function when IP changes even though new domain host doesn’t offer dynamic IP updating.

Will see what happens and update…

Retiring some hardware

…when a computer’s been around too long

Time to retire some old tech. That display is a whopping 15″ diagonal. Resolution was limited. Only used it for a terminal for a server these last six years or so. And this is it under my arm on the way to the dumpster.

Right after the monitor, the old server was carried out to rubbish.

BEFORE delivering to rubbish I made sure to wipe the HD with DBAN, Darik’s Boot and Nuke. Have relied on it for years.

The computer’s manufacturing date stamp was 082208. Didn’t think to take a photo. It was a Dell OptiPlex 330 SFF, Pentium Dual Core E2160 1.8GHz, 4GiB RAM, 90 GB HD. They looked like this.

I got it in 2015. It had been replaced during a customer hardware upgrade then sat on the shelf unpowered for about a year before I joined that office. On hardware clean-out day it was in a pile to take home or put in the dumpster.

It became my boba.org server sometime in 2015 and served that function until December 2022.

Six years of service and then it sat on the shelf for a year. Then eight years hosting boba.org. Fourteen years of service is a LONG life for a computer!

The replacement “server” is an old laptop, old, but it’s new enough it doesn’t have an Ethernet port. I got a USB Ethernet adapter, Realtek Semiconductor Corp. RTL8153 Gigabit Ethernet Adapter, and plugged a cable in. Better performance than WiFi.

Hardware is several steps above the old server too. Intel Core i3-5015U CPU @ 2.10GHz, 6GiB RAM, 320 GB HD (I should replace with SSD). Date of manufacture isn’t as clear. Maybe late 2015 early 2016.

The CPU Benchmark comparison of the two processors, Intel Core i3-5015U vs Intel Pentium E2160, shows clear differences in processing power.

Now that the new server is up, well has been for a few months but I didn’t want to add new services until I got secondary DNS running, its time to add features and services on the network.

bind9 primary and secondary DNS on home LAN

I now have two DNS servers for my home network. Once I took DNS and DHCP off the router and moved them onto the server it was easy to connect to services on the home network by DNS name. But if the one DNS server was down then no devices could get to the Internet. Not good.

Time to set up a second DNS server. That need prompted my first Raspberry Pi purchase. The default app for DNS and DHCP on Raspberry Pi is DNSMasq. Tried to make it secondary to the existing primary BIND9 server. I didn’t work that out so purge DNSMasq from the Raspberry Pi and install BIND9.

Once I got the config statements worked out it’s been fun disabling one or the other and having the resolvectrl status command show the flip back and forth between the active DNS server and my web pages are found regardless the server that’s running.

The host with both DNS servers running:

localhost:~$ resolvectl status interface
Link 3 (interface)
      Current Scopes: DNS          
DefaultRoute setting: yes          
  Current DNS Server: 192.168.0.205
         DNS Servers: 192.168.0.203
                      192.168.0.205

…shutdown the .205 bind9 server

server205:~$ sudo systemctl stop bind9.service
server205:~$ sudo systemctl status bind9.service
* named.service - BIND Domain Name Server
     Loaded: loaded (/lib/systemd/system/named.service; enabled; vendor preset: enabled)
     Active: inactive (dead) since Mon 2023-01-23 06:51:42 EST; 35s ago

…and now the host’s current DNS server changes once the .205 bind9.service is shutdown.

localhost:~$ resolvectl status interface
Link 3 (interface)
      Current Scopes: DNS          
DefaultRoute setting: yes          
  Current DNS Server: 192.168.0.203
         DNS Servers: 192.168.0.203
                      192.168.0.205

Perils of a part time web server admin

Not being “in it” all the time can make simple things hard.

Recently one of the domain names I’ve held for a while expired. Or actually, I let it expire. It was hosted on this same web server along with several other websites and had a secure connection using a Lets Encrypt SSL certificate. All good.

The domain name expired, I disabled the website, and all the other websites on the server continued to be available. Until they weren’t! When I first noticed I just tried restarting the web server. No joy, that didn’t get the other sites back up.

And here’s the perils of part time admin. Where to start with the troubleshooting? For all my sites and the hosting server I really don’t do much except keep the patches current and occasionally post content using WordPress CMS. Not much troubleshooting, monitoring logs, etc. because there isn’t much going on. And, though some might say otherwise, I don’t spend all my time at the computer dissecting how it operates.

I put off troubleshooting for a while. This web server’s experimental, not production, so sometimes I cut some slack and don’t dive right in when things aren’t working. Had other things pending that required more attention.

When I did start I was very much at a loss where to start because, as noted, I disabled a web site and everything continued to work for a while. When it stopped working I hadn’t made any additional changes.

Logs are always a good place to look, yes? This web server is set up to create separate logs for most of the sites it’s hosting. Two types of logs are created, access logs and error logs. Access logs showed what was expected, no more access to that site after I disabled it.

Error logs confused me though. The websites use Lets Encrypt SSL certificates. And they use Certbot to set up the https on the Apache http server. A very common setup. The confusing thing about the error log was it showed the SSL configuration for the expired web site failing to load. Why was the site trying to load at all??? I had disabled the site using the a2dissite program provided by the server distribution. The thing I hadn’t thought about is the Certbot script for Apache sets up the SSL by modifying the <site_name>.conf file AND creating a <site_name>-le-ssl.conf file.

So even though the site had been disabled by a2dissite <site_name>.conf I hadn’t thought to a2dissite <site_name>-le-ssl.conf. Once I recognized that issue and ran the second a2dissite command the web server again started right up. No more failing to load SSL for the expired site. And, surprising, failing to load the SSL for the one site prevented the server from starting rather than disabling the one site and loading the others that didn’t have configuration issues.

Something for another time… I expect there must be a way for the server to start and serve correctly configured sites while not loading incorrectly configured sites and not allowing presence of an incorrectly configured site to prevent all sites from loading. It just does not seem likely that such a widely used web server would fail to serve correctly configured sites when only one or some of multiple hosted sites is misconfigured.

The perils of part-time admin, or jack of all trades and master of none, is that these sort of gotcha’s pop up all the time because of limited exposure to the full breath of dependencies for a program to perform in a particular way. It isn’t a bad thing. Just something to be aware of so rather than blame the software for not doing something, need to be aware that there are often additional settings to make to achieve the desired effect.

Be patient. Expect to need to continue learning. And always, always, RTFM and any other supporting documents.

Server upgrade

…and I’m publishing again.

Well, this was a big publishing gap. Four months. Hope not to have such a long one again. Anyway, there are a number of drafts in the wings but I decided to publish about this most recent change because it is what I wanted to get done before publishing again.

The server is now at Ubuntu 20.04, 64‑bit of course. It started out at 16.04 32‑bit, got upgraded to 18.04 i686 and then, attempted 20.04 upgrade and couldn’t because had forgotten was legacy 32‑bit and 20.04 only available in 64-bit. On to other things and plan different upgrade solution. When I got back to it I thought should upgrade to 22.04 since that had been released. As I’m going through the upgrade requirements I discovered that several needed applications didn’t have 22.04 packages yet, particularly Certbot and MySQL. So back to 20.04 and complete the upgrade.

MySQL upgrade wasn’t too bad. There was a failure, but it was common and a usable fix for the column-statistics issue was found quickly. Disable column-statistics during mysqldump (mysqldump -u root -p --all-databases --column-statistics=0 -r dump_file_name.sql).

Also, switched to the Community Edition rather than the Ubuntu packages because of recommendations online at MySQL about the Ubuntu package not being so up to date.

Fortunately I’m dealing with small databases with few transactions so mysqldump was my upgrade solution. Dump the databases from v 5.x 32-bit. Load them into v 8.x 64-bit. But wait, not all the user accounts are there!!

select * from INFORMATION_SCHEMA.SCHEMA_PRIVILEGES; will show only two grantees, 'mysql.sys'@'localhost' and 'mysql.session'@'localhost'. There should be about 20. The solution was simple, add upgrade = force to mysql.cfg and restart the server. After this, select * from INFORMATION_SCHEMA.SCHEMA_PRIVILEGES; shows all the expected accounts AND the logins function and the correct databases are accessible to the accounts.

All the other applications upgraded successfully. DNS, ddclient, Apache2, and etc. It was an interesting exercise to complete and moved the server onto newer, smaller hardware and updated the OS to 64-bit Ubuntu 20.04.

I’ll monitor for 22.04 packages for Certbot and MySQL and once I see them, update the OS again to get it to 22.04. Always better to have more time before needing (being forced) to upgrade. 20.04 is already about halfway through its supported life. Better to be on 22.04 and have almost five years until needing to do the next upgrade.

Doing all this in a virtual environment is a great time saver and trouble spotter. Gotchas and conflicts can be resolved so the actual activation, virtual or physical, goes about as smoothly as could be hoped with so many dependencies and layers of architecture. Really engrossing stuff if you’re so inclined.

DHCP on the server was new. The router doing DHCP only allowed my internal DNS as secondary. That seemed to cause issues reaching local hosts, sometimes the name would resolve to the public not the private IP. Switching to DHCP on the server lets it be specified as THE DNS authority on the network.

Watching syslog to see the messages, the utility of having addressable names for all hosts seemed obvious. A next virtual project, update DNS from DHCP.

Attractive deal? Check how long that website’s been around.

Was that vendor set up yesterday to try and take money from you today?

One thing that happens as advertisers get their algorithms into you is much more targeted advertising. Often times with a web link.

Ever wonder how long that website’s been around? Setting up shop, scamming money, and disappearing are tactics that have been around since scams. Long before the Internet. Checking how long a domain name has been around can help detect a scam.

One thing I do when I check advertising is check how old the domain name is. The domain name is the .com, .org, .gov, .net, etc., plus the word before it starting from the preceding / or ., whichever is closest before the .com. Examples like www.disney.com breakdown to domain name disney.com.

How old is the domain name disney.com?

The whois command reveals that information and more with 156 lines of output. The dates are among the first lines and are scrolled off the top of the screen. So scroll up to them to see them.

Substitute a function, called by the same name, that uses whois and grep to produce less output, and focused on dates and attributes like URLs. The substitute command returns 23 lines. These are the lines.

$ whois disney.com
   Updated Date: 2021-01-21T15:04:59Z
   Creation Date: 1990-03-21T05:00:00Z
   Registry Expiry Date: 2023-03-22T04:00:00Z
NOTICE: The expiration date displayed in this record is the date the
currently set to expire. This date does not necessarily reflect the expiration
date of the domain name registrant's agreement with the sponsoring
view the registrar's reported date of expiration for this registration.
Updated Date: 2021-01-15T16:22:12Z
Creation Date: 1990-03-21T00:00:00Z
Registrar Registration Expiration Date: 2023-03-22T04:00:00Z
Registry Registrant ID: 
Registrant Name: Disney Enterprises, Inc.; Domain Administrator
Registrant Organization: Disney Enterprises, Inc.
Registrant Street: 500 South Buena Vista Street, Mail Code 8029
Registrant City: Burbank
Registrant State/Province: CA
Registrant Postal Code: 91521-8029
Registrant Country: US
Registrant Phone: +1.8182384694
Registrant Phone Ext: 
Registrant Fax: +1.8182384694
Registrant Fax Ext: 
Registrant Email: Corp.DNS.Domains@disney.com

Easier to see only the dates and some other relevant info by customizing my own whois. I am sure it can be improved on, but for the time being this listing is the substitute whois in my .bash_aliases.

function whois {

        if [ $# -ne 1 ]; then
                printf "Usage: whois <domain.tld>\nTo use native whois precede command with \\ \n "
                return 1
        fi

# implemented code calls installation whois by full path 
        /usr/bin/whois $1 | grep -wi "date\|registrant\|contact 
domain\|holder"
## haven't tried outside Ubuntu
## a possibility to make this somewhat portable
## $(which whois) $1 | grep -wi "date\|registrant\|contact 
domain\|holder"
}

Now, for an advertisement that’s been showing up in my Facebook feed lately, there’s listncnew.com. Sells NEW laptops and Macbooks for $75 – $95!! I figured it must be scam but, for that price, worth the risk because could cancel the credit card transaction. Before I made the order I ran the domain name through my substitute whois to see when the domain was registered. It was created October, 2021, very new. I didn’t expect to get my order and didn’t. At least I wasn’t out the money and now have a way to look at whois data that limits the output to show only information relevant to me.

whois listncnew.com
   Updated Date: 2021-10-26T09:14:16Z
   Creation Date: 2021-10-26T09:10:35Z
   Registry Expiry Date: 2022-10-26T09:10:35Z
NOTICE: The expiration date displayed in this record is the date the
currently set to expire. This date does not necessarily reflect the expiration
date of the domain name registrant's agreement with the sponsoring
view the registrar's reported date of expiration for this registration.
 Updated Date: 2021-10-26T09:13:25Z 
 Creation Date: 2021-10-26T09:10:35Z 
 Registrar Registration Expiration Date: 2022-10-26T09:10:35Z 
 Registry Registrant ID: 5372808-ER 
 Registrant Name: Privacy Protection 
 Registrant Organization: Privacy Protection 
 Registrant Street: 2229 S Michigan Ave Suite 411 
 Registrant City: Chicago 
 Registrant State/Province: Illinois 
 Registrant Country: United States 
 Registrant Postal Code: 60616 
 Registrant Email: Select Contact Domain Holder link 
 Admin Email: Select Contact Domain Holder link 
 Tech Email: Select Contact Domain Holder link 
 Billing Email: Select Contact Domain Holder link


This is my first post in a while. Haven’t been routine releasing posts this year. There’s another five that have been hovering in edit for a while. Maybe I can get them out before the end of this year.

Don’t get phished – take a test

How many times will you be fooled? Take the test and learn not to be.

Phishing is very common. I’ve written a number of posts cautioning readers and providing examples.

Today I came across something even better! An online phishing test hosted by Google. It presents you with messages and asks whether they are “real” or phishing.

It’s a test… so no messages are really real. But the messages do give you the opportunity to learn if you’d fall victim to phishing. And to learn how to avoid being a victim. Whether the message is phishing or not is explained and illustrated after you judge the message’s authenticity.

Fun. Try it.

Jigsaw | Phishing Quiz

Phishing, don’t get hooked!

Give yourself a Merry Christmas, don’t get phished.

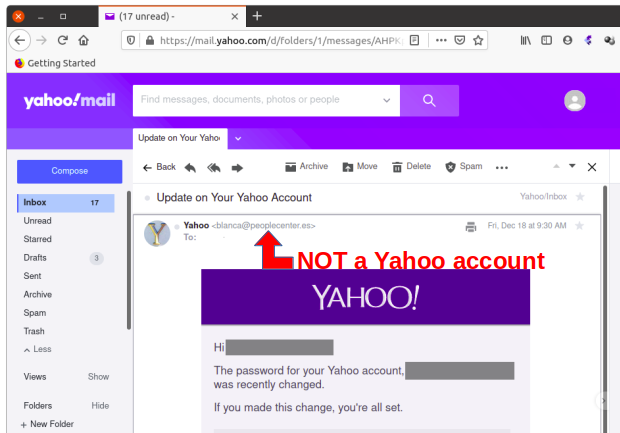
I have posted about phishing before. Hopefully some of what I’ve posted or others have posted has been useful to you. I’m posting again because I got another phishing email just recently that, when I saw it in my Inbox, made me worry for a few moments. That’s because my Inbox shows the subject and the first words of the body of the email. So, what I saw in my Inbox was, “Update on Your Yahoo Account the password for your Yahoo account was recently changed”!

Immediate concern. I did not recently change my Yahoo password. And the sender column of my Inbox does not show the email address. It shows the sender name, in this case “Yahoo”. Have I been hacked? Fortunately, no. If I was in a rush and not paying attention though I might have given up my Yahoo credentials out of panic. So I’m posting again to remind myself, and anyone reading this, DON’T rush when you get an email about your accounts. Take the time to look them over and be certain of what you’ve gotten.

In this case the Inbox view said the email was from Yahoo. As soon as I opened the message it was clearly NOT from Yahoo.

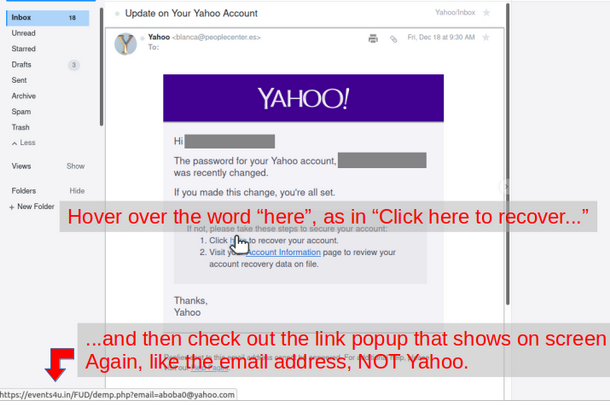
From there, it’s all the usual stuff to know it’s fake. Hover over the link to go fix the “problem” and see the link doesn’t go to a Yahoo.com website.

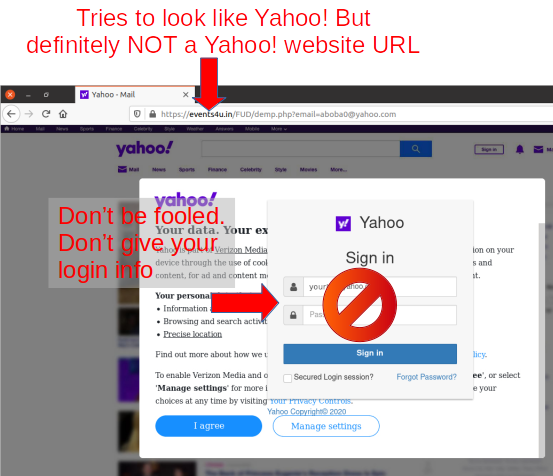
Then last, I clicked on the link so you could see the webpage it goes to. And you see even though it tries to look like a Yahoo page it clearly is not a Yahoo site.

Please, don’t get hooked. There’s not enough info in the Inbox view to know whether this is something to worry about or not. Once the email is opened there’s two different opportunities to see it isn’t a Yahoo! message.

  • The “From:” is not a Yahoo! account.
  • Hover over the link and it clearly is not a Yahoo! URL.
  • And finally, if the link is clicked… the URL for the webpage definitely is not a Yahoo! URL.

Stay web safe and have a Merry Christmas.

Got vsftpd?

The path from “need a few files” to providing any time you like self service.

I tend to have computer components and a few spare computers hanging around. Both because I haven’t got hit with Marie Kondo fever (I’m not really bad) and because I help my kids with equipment selection, sometimes purchase, and benefit from getting their leave behinds to experiment with.

In this case one son had upgraded so I got the old laptop. It needed some work to be useful, badly damaged digitizer. He also wanted files from the hard drive but didn’t have opportunity to get them before leaving me the pc.

I replaced the digitizer and swapped out the hard drive with a loose one I had around so I could use the pc. Put the original drive in an external USB3 enclosure I had, labeled it not to erase, and set it aside.

Then said son asked for four files from the old drive. No problem I thought. Plug the drive into the USB port of my laptop, read them off the drive and send. Nope.

This son is one I’ve gotten to use Linux on several systems. I’d set up Linux for him on this system and used the default partition method at the time, LVM. Couldn’t read the drive. My system, using the current default, ZFS, didn’t have the ability to mount the drive.

Here’s one of the reasons I find Linux to be easy to use, all I needed to do was install LVM on my system and reboot. Presto I could read the external drive. It now automatically mounts when plugged in to USB. And the ZFS install of my system wasn’t affected at all.

Now try to read his files for him. Nope. He had been traveling internationally so I’d set up an encrypted home directory for him. Fortunately I’d kept the encryption passphrase in my password safe and was able to mount the encrypted home directory. I still wasn’t getting files in the clear though. It seemed related to the fact the drive was no longer the boot drive. Went down that rabbit hole for a bit and seemed to be making progress. Finally though, to get him the files, I just asked him if he recalled his login password. He did.

Booted the old pc and selected the external HD to boot from, it went right to login screen, enter password, and I’m logged in to the old system. Another Linux advantage, take an original host drive, plug it into USB on another pc, select that drive as boot source, and Linux boots without complaint.

I sent him the files he wanted. Then I thought to send him a list of all files in his home directory. After all he might want others and just not recall their names. Sure enough, he wanted a few more after getting the list.

Now I’m thinking, if he wants more files, then more work for me. What if, instead, he can get the files on his own any time he likes? Could I set up an ftp site he could connect to and get files whenever he wished?

This is where vsftpd finally enters the picture. My plan was boot from the old hard drive using a spare pc, make an ftp site that used an encrypted connection so not even username/password are sent in the clear and provide him the connection information.

vsftpd is an easy set up. Run the installation and it accepts anonymous connections by default. Didn’t want anonymous though and wanted connection to go to his home directory. Read the man, linux.die.net is my favorite man source, search for others’ descriptions of how to set up a credentialed, encrypted connection, and keep hacking at it until it worked.

The thing that really stymied me was the obscure failure message when vsftpd was failing to start after some of the config changes I made. I couldn’t find a parameter to boost the detail of the logging and was left with only “status=2/INVALIDARGUMENT” to try and figure out what parameter was the problem. Fortunately I came across Why my vsftp service can’t start?. It offered the tip to run /usr/sbin/vsftpd manually from the command prompt and the specific issue might be revealed. I tried, the problematic option was revealed, changed the option and presto, working vsftpd using TLSV1 for connections!

For your interest, here’s my working vsftpd.conf

anonymous_enable=NO
local_enable=YES
chroot_local_user=YES
allow_writeable_chroot=YES
listen=NO
listen_ipv6=YES
dirmessage_enable=YES
use_localtime=YES
xferlog_enable=YES
user_sub_token=$USER
local_root=/home/$USER
rsa_cert_file=/etc/letsencrypt/live/fullchain16.pem
rsa_private_key_file=/etc/letsencrypt/live/privkey16.pem
ssl_enable=YES
allow_anon_ssl=NO
force_local_data_ssl=YES
force_local_logins_ssl=YES
ssl_tlsv1=YES
ssl_sslv2=NO
ssl_sslv3=NO
require_ssl_reuse=YES
ssl_ciphers=HIGH
pasv_min_port=xxxxx
pasv_max_port=yyyyy
pam_service_name=vsftpd
implicit_ssl=NO